FAQs
Why does the setup wizard for my DCS camera not work?
• Ensure you are using the latest version of the wizard, check the version num-ber available on http://eu.mydlink.com/ against the version you are attempt-ing to use.
• It is possible that you have downloaded the wrong wizard. Please ensure you have downloaded the wizard for the correct model camera.
• It is possible that you have downloaded the wrong wizard. Please ensure you download the setup wizard for the correct hardware version of your camera. (For more information, please refer to the Q&A document “How do I check the hardware version of my DCS Camera?”)
• Ensure that your router allows UPnP.
• Ensure that if you are using a computer with Microsoft Windows Vista or above, that your network type is set to “Home Network” or “Work Network”. Setting to “Public Network” will stop the wizard from being able to detect the camera.
What is RAID?
RAID is a method of utilising space on multiple hard disks. Our NAS devices support the following RAID types:
• RAID 0
• RAID 1
• RAID 5 (RAID 5 + Hot Spare)
• RAID 6
• RAID10
We suggest using disks of the same size when creating RAID arrays. Where disks of different sizes are used, the overall available space will be based on the size of the smallest disk, or the existing size of the array.
• RAID 0 needs a minimum of 2 hard disks and uses the all available space on the disks, and provides no redundancy.
• RAID 1 needs (a minimum of) 2 hard disks and mirrors the information from one disk to another. RAID 1 can tolerate the failure of 1 hard disk.
If disks of different sizes are used, the overall space available will be that of the smaller disk. The remaining space on the larger disk can be formatted as a different volume that will NOT be part of the RAID array.
• RAID 5 (or RAID 5 + Hot Spare) needs a minimum of 3 hard disks, and can tolerate the failure of 1 hard disk.
If disks of different sizes are used then the overall space will be a multiple of the size of the smallest disk in the array. The remaining space on the larger disk(s) can be formatted as a different volume that will NOT be part of the RAID array.
• RAID 6 needs a minimum of 4 drives and can tolerate the failure of 2 disks.
If disks of different sizes are used then the overall space will be a multiple of the size of the smallest disk in the array. The remaining space on the larger disk(s) can be formatted as a different volume that will NOT be part of the RAID array.
• RAID 10 needs a minimum of 4 disks and can tolerate the failure of 1 disk in each array span.
As with RAID 1, if disks of different sizes are used then the overall space will be twice the size of the smallest disk in the array.
With RAID 1, 5, 6 and 10, it is possible for the NAS to automatically rebuild the ar-ray when the failed disk is replaced.
How do I setup FTP in my DNS?
Step 1 – Login to the DNS, and click “Management” in the top menu bar.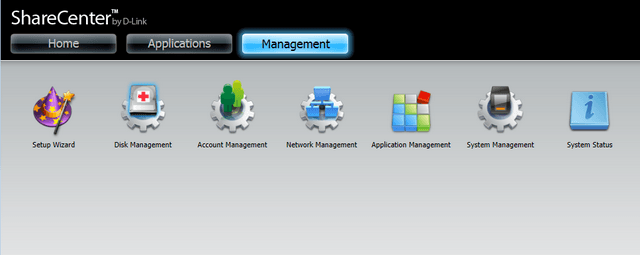
Step 2 – Click “Application Management”. This will open the FTP Server settings page.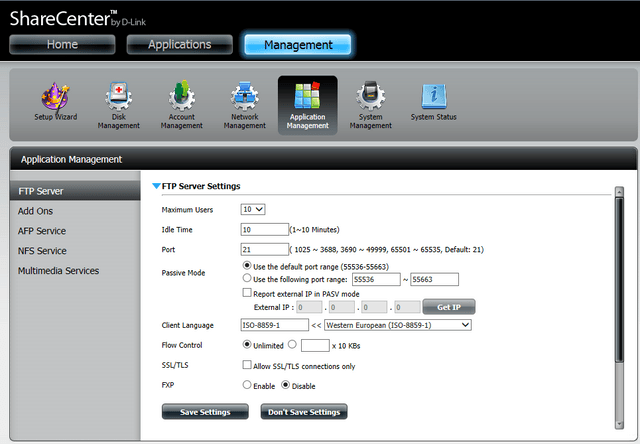
Step 3 – The default values should be sufficient to get the ftp server running. This will allow local access to the ftp server. If you make any changes, please ensure you click “Save Settings”.
Step 4 – Scroll down, and click “FTP Server Status”. Here you can start or stop the ftp server.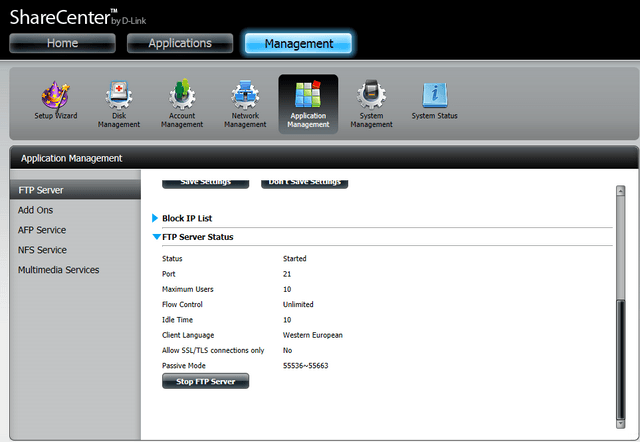
Step 5 – If you want to access the ftp server from outside your LAN, then you will need to setup port forwarding in your router, to forward the ftp server port (port 21 by default) from your router to your NAS. You will then be able to access your NAS ftp server using your public IP address of dlinkddns hostname if you have one.
How do I Create Users, Groups and Share Folders in DNS-320L?
Create Users, Groups and Folder Sj¡haring in DNS-320L
1. Enter the NAS web configuration
2. To Create Network Shares:
• Click on “Network Shares” and then click “New”
• On “Welcome to Network Shares Setup Wizard”, click “Next”
• Here you can select the Volume_x or click on top of Volume_x, click on “New”
• Enter a name for the folder and click accept
• Click inside the box next to the folder you created, then click “Next”
• Select “All Accounts” or Specified User/ Groups
• Assign access rights
• Select “Map Archive” and “Recycle”, then click “Next”
• Select the “Access Modes”, then click “Next”
• Select the FTP Settings, then click “Next”
• Type “*” for “Host” and click inside box for “Write”, then click “Next”
• Select the WebDAV settings and then click “Next”, then “Finish”
3. To Create Users – User Settings:
• Click on “Users / Groups”, and then click “New”
• On “Welcome to the User Setup Wizard”, click “Next”
• Here you can either create; A Single User or Multiple Users, then click “Next”
• Enter details of User and Password, then click on “Next”
• If no groups have been made, you will be presented with “No Group(s) have been added to this NAS”, click on “Next”
• Select the “Network Share Settings” for the Share Name, then click “Next”
• Select the Privileges, then click “Next”
• Select the WebDAV settings, then click “Next”
• Select the Quota Settings (0 value in unlimited), then click on “Next” then “Finish”
4. To Create Groups – Group Settings:
• Click on “Users / Groups”, and then click “New”
• On “Welcome to the Group Setup Wizard”, click “Next”
• Enter a Group Name”, then click “Next”
• Select the User you wish to join to then Group, then click “Next”
• Select the Network Share Settings, then click “Next”
• Assign the Privileges, then click “Next”
• Select the WebDAV settings, then click “Next”
• Select the Quota Settings (0 value in unlimited), then click on “Next”, then “Finish”
How to set up email alerts on your IP Camera DCS-932L?
To configure the SMTP server:
1 - Click on the SETUP tab and then select on Mail button:
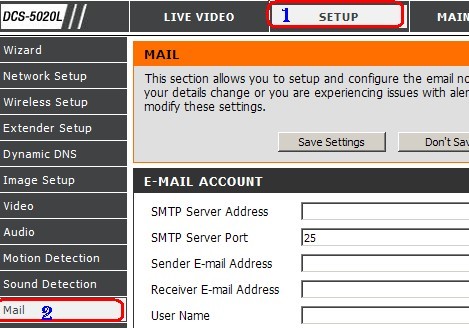
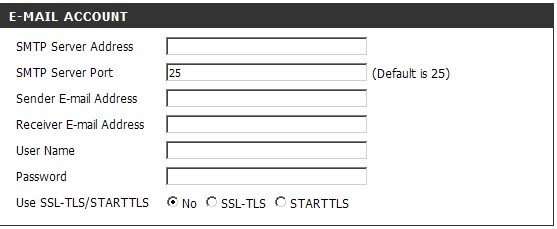
2 - Under the “E-MAIL ACCOUNT” section, configure the following:
1. SMTP Server Address: Enter you SMTP server address
2. SMTP Server Port: the port number corresponding to your smtp server
3. Sender E-mail Address: Enter your email address
4. Receiver E-mail Address: Enter the same email address
5. User Name: Enter the username of your email address
6. Password: Enter the password to access the mail account
7. Select the security type corresponding to your SMTP server.
3 – Click on “SAVE SETTINGS”
4 – Under the section “Setup” “Network setup”:
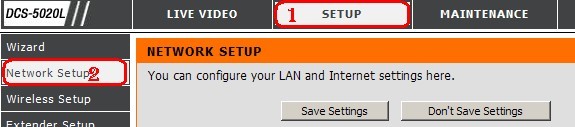
Set the DNS parameters:
a. Primary DNS : 8.8.8.8
b. Secondary DNS : 8.8.4.4
5 – Finally click “SAVE SETTINGS” to save the parameters, and click “Test” from the menu:
“Setup” -> “Mail” -> “TEST E-MAIL ACCOUNT”

How to connect to DNS-320L via webdav in Mac OS X?
Step 1
Download the trial version of Interarchy from http://nolobe.com/interarchy/
Extract the app, and move to the Applications folder.
Step 2
Open Interarchy, and you will see a window like this:
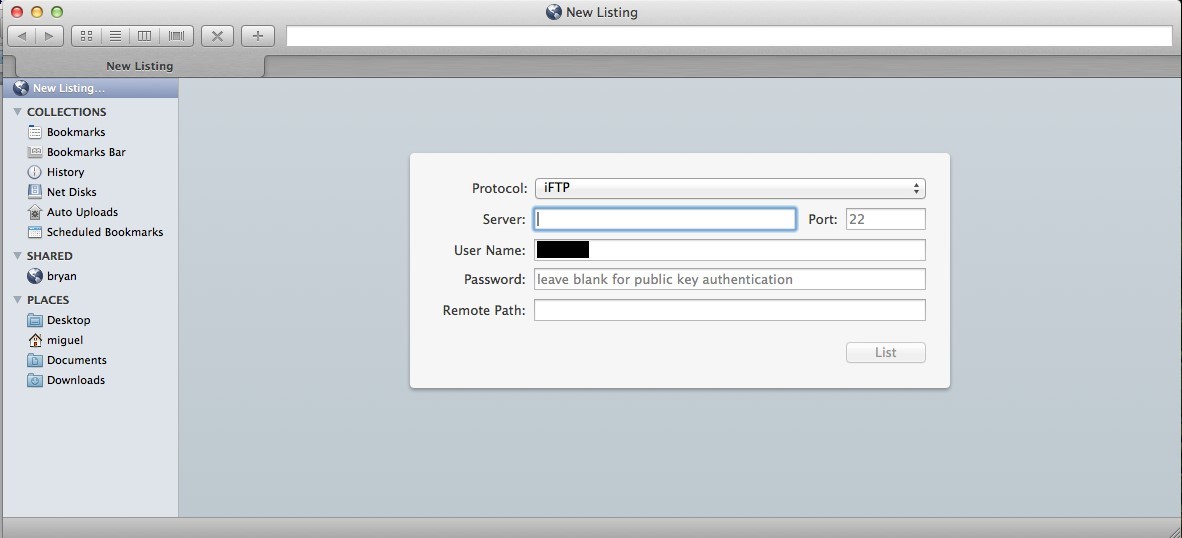
- In the protocol drop-down, select WebDAV
- In the server, type the IP or hostname you use to connect to your DNS-320L
- You can either leave the port as default (80) or change it to 443
- Type in the username and password you have set for webdav access.
- In remote path type: /webdav/YOUR WEBDAV SHARE
- (Where YOUR WEBDAV SHARE is the name/path of the folder you have set as a web-dav share)
- Click List
This will connect you to your DNS-320L via webdav.
My mobile device will not connect to the wifi network of my DIR product.
The Wi-Fi Alliance has directed the WiFi industry to phase out support for WEP, as it is an obsolete insecure method of encryption. Manufacturers are now removing WEP support from devices.
It is strongly advised that you log in to your DIR device, and alter your WiFi encryption from WEP to WPA-Personal.
What is the Max USB drive size supported in the DIR-505?
What is the Max USB drive size supported in the mobile companion?
The DIR-505 supports USB drives up to 250GB.
How do I connect my USB device to the DIR-505?
How to connect to my USB device?
Note: Make sure you have allowed SharePort as a trusted program in your firewall/anti-virus software, or disable it.
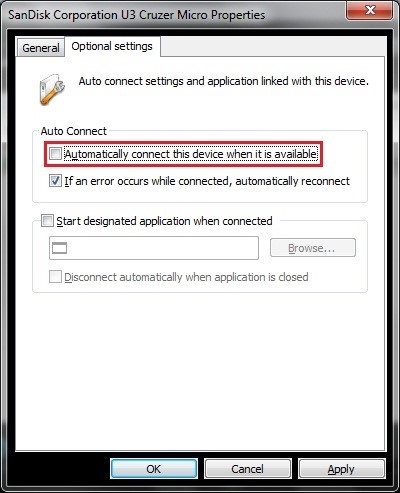
Step 1: Open the SharePort utility and select the 1st device on your list. Right-click and select Properties.
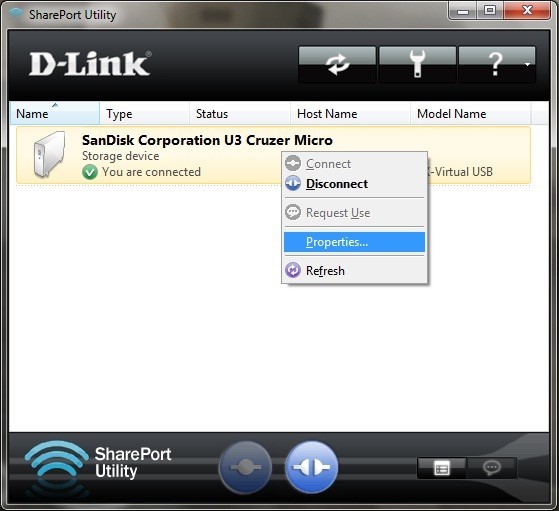
Step 2: Click on the Optional settings tab and un-check Automatically connect this device when it is available. Click Apply, then click OK.
How to view contents of my USB drive using the DIR-505?
First, check that your smartphone or tablet is wirelessly connected to the DIR-505. Sometimes these devices switch wireless networks without notifying the user.
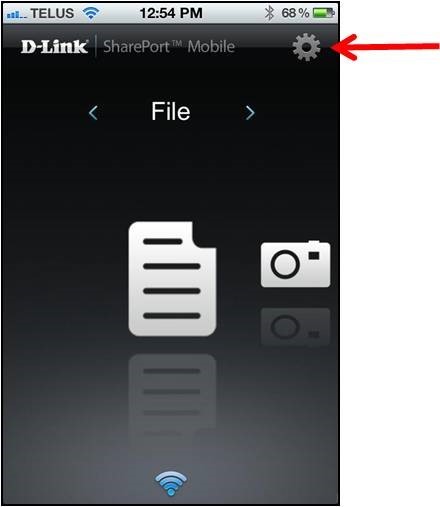
Next, in the SharePort Mobile app, tap on the Gear icon in the top-right corner to access the SharePort Settings.
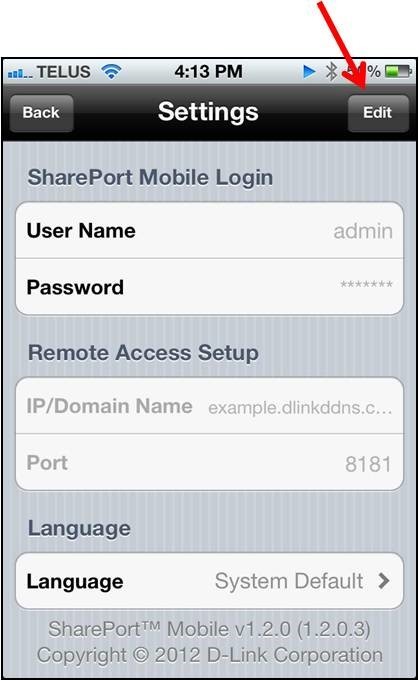
Ensure the User Name and Password for your DIR-505 is entered correctly (NOTE: This will be the user name and password used to log into the DIR-505 web interface, and not the wireless name and passphrase.)
If you are still unable to view the contents, reboot your device and open the SharePort Mobile app again.
Powerline Installations Considerations
Plan the location of your Powerline devices:
1. Connect Powerline devices to electrical outlets that are not controlled by a wall switch to avoid accidentally turning off power to the device.
2. Do not connect the Powerline devices to an extension cord, surge protec-tor, or power strip as this might prevent it from working correctly, or nega-tively impact network performance.
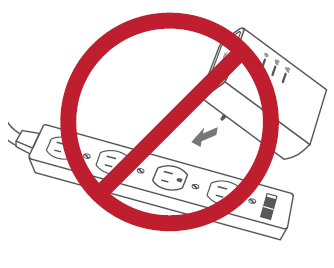
3. Avoid using the Powerline devices in an electrical outlet that is located near to an appliance that uses a lot of power such as, a washing machine or tumble-dryer, or a refrigerator. This may prevent the adapter from working correctly, or negatively impact network performance.
4. Verify that your Powerline devices are electrically rated to operate within the power available within your location.
5. To help prevent against electrical shock, be sure to plug the power cables into properly grounded electrical outlets.
Powerlines and Wireless Installation Considerations
The Powerline DHP-W lets you access your network using a wireless connection from anywhere within the operating range of your wireless network. Keep in mind that the number, thickness and location of walls, ceilings, or other objects that the wireless signals must pass through may limit the range. Typical ranges vary depending on the types of materials and background RF (radio frequency) noise in your home or business. The key to maximizing wireless range is to follow these basic guidelines:
1. Keep the number of walls and ceilings between the wireless DHP device and other network devices to a minimum. Each wall or ceiling can reduce your adapter’s range by 3-90 feet (1-30 meters). Position your devices so that the number of walls or ceilings is minimized.
2. Be aware of the direct line between network devices. A wall that is 1.5 feet thick (.5 meters) at a 45-degree angle appears to be almost 3 feet (1meter) thick. At a 2-degree angle it looks over 42 feet (14 meters) thick! Position devices so that the signal will travel straight through a wall or ceiling (instead of at an angle) for better reception.
3. Building materials make a difference. A solid metal door or aluminium studs may have a negative effect on range. Try to position the wireless DHP device and any computers so that the signal passes through drywall or open doorways. Materials and objects such as glass, steel, metal, walls with insulation, water (fish tanks), mirrors, file cabinets, brick, and concrete will degrade your wireless signal.
4. Keep your product away from (at least 3-6 feet or 1-2 meters) other electrical devices or appliances that generate RF noise.
5. If you are using 2.4GHz cordless phones or wireless products such as ceiling fans, lights, or home security systems, your wireless connection may degrade dramatically or drop completely. Make sure your 2.4GHz phone base unit is as far away from your wireless devices as possible. The base transmits a signal even if the phone is not in use.
How to configure the DHP-W311AV?
The following steps will help you synchronize the DHP-W311AV.
Step 1 – Connect both products to the same power socket/power strip.
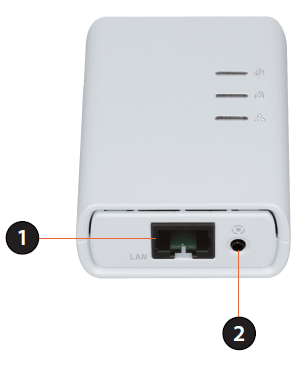
Step 2 – On the non-wireless device (the smaller device with the 3 lights) press the button (marked as 2 in the image below) for 10 seconds. The button is next to the network socket (marked as 1 in the image below).
Step 3 – On the wireless device (the larger device with 4 lights) press the reset switch (marked as 1 in the image below) with a paperclip for 10 seconds.
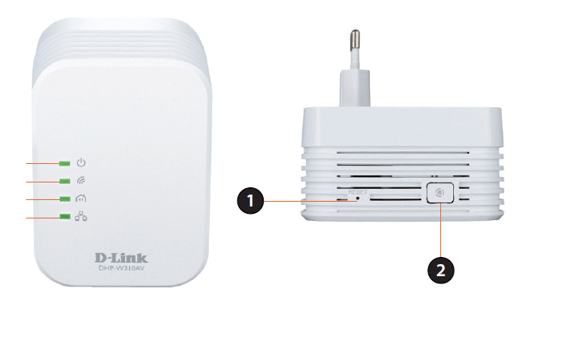
Step 4 – Check that the light with the icon like a house is lit in green on both devic-es. This indicates that both units are communicating.
Step 5 – You can now scan for Wireless networks on your computer.
Step 6 – Locate the network name that starts with "dlink".
Step 7 – Connect to this network and enter the password as it appears on the card included with the device.
Step 8 – Check that you are able to connect to the internet.
Step 9 – You can now locate the wireless device wherever you want to use it. When the light turns green the device has finished booting up.
Step 10 – Check that the light with the house icon is green. If not, then either try a different power outlet, or try moving the device closer to the router.
What is the ethernet port?
In Router/AP mode, the Ethernet port is used to connect to your existing wired network (e.g. an existing router, a wired connection in a hotel room or Broadband Modem).
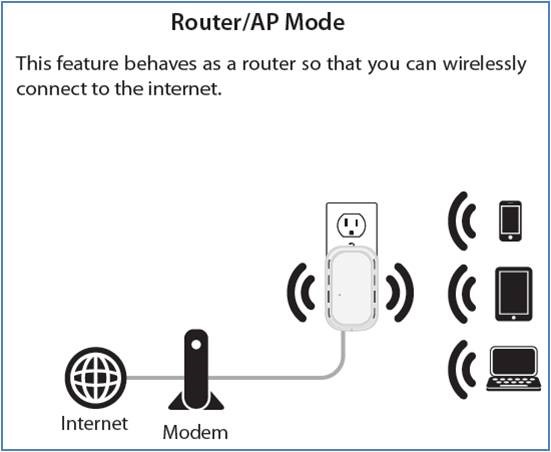
In Repeater and Wi-Fi Hotspot modes, the Ethernet port is used to connect a wired client to the wireless network (e.g. computer, Smart TV, video game console).
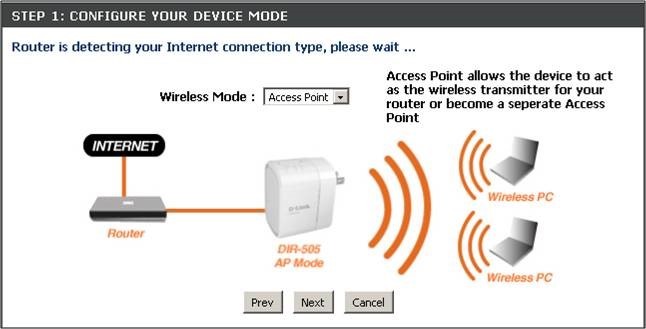
How to switch the DIR-505 between Router and Access Point mode?
How to switch between Router and Access Point mode?
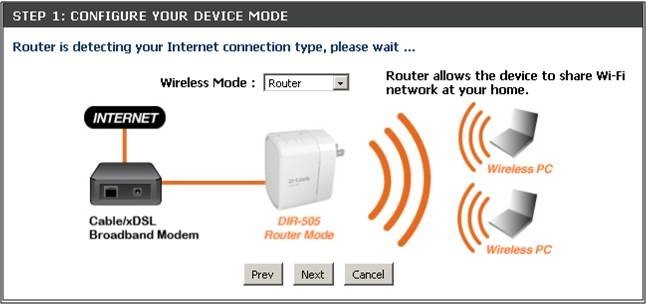
Step 1: Move the toggle switch on the DIR-505-á to Router/AP mode and power on the device

Step 2: Run the setup wizard in the DIR-505's Web Interface to select whether you want to use Router or Access Point (AP) mode.
How to create a key for the wireless network of your product DHP-W306AV?
- Change to a computer that is connected by cable to the router or switch and make sure the LED that has a drawing of a house is on before starting, if the LED is not lit it indicates that the PLC is not synchronized.
- Open the following address in the browser of your computer, Internet Explorer, Chrome or Firefox.
http://dlinkap - If an installation wizard cancel it. If he asks for username and password use as user "Admin" and Password blank (no password) and chop on the "Log In"
- Once inside the product configuration click on the SETUP option located in the top menu
- WIRELESS SETUP Click on the menu on the left
- Towards the end of the page you will find the title "WIFI PROTECTED SETUP", (if this option is not pink in the top menu on Advanced in the menu on the left find the Wi-Fi Pro-tected Setup, click there and proceed to)
- Uncheck ENABLE and click SAVE SETTINGS. (If you see the LOGIN page, this means that it has taken too long for the procedure and will have to do it from the beginning again)
- Wait until the changes are saved and click BACK.
- SETUP Click on the top menu
- WIRELESS SETUP Click on the menu on the left
- Under the title WIRELESS NETWORK SETTINGS find the Wireless Network Name op-tion, here you have to change the name of your wireless network, you can put any name (home, office, etc.)
- In the centre locate the section SECURITY MODE
- Select the "Enable WPA2-AUTO" or "WPA-Personal"
- Below you will see a title called WPA2-AUTO, go to the page parameter called Pre Shared Key or Passphrase
- Enter a password for your wireless network (minimum 8 characters) Please note that this will be your wireless network key so you have to remember to connect wirelessly.
- Click on SAVE SETTINGS. Wait for it to save changes and click BACK.
- You can now close the browser
At this time the product is already configured. From your wireless computer search again for available networks and find the new network name that has been given to your Wi-Fi net-work, you will notice that the network now appears with a lock because it has security ena-bled, click to connect to the network and the operating system prompts you set the key to connect, once connected usually remember your password operating system on your computer and not have to enter it each time you connect.
https://eu.dlink.com/